February 22, 2013

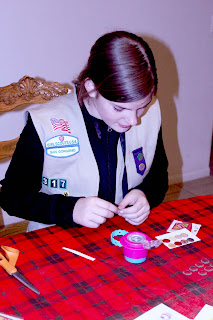
Girls Scouts Get Crafty with Crafty Bands

Looking for something fun for your next Girl Scout meeting?

Why not pick up some Crafty Bands and let the girls create their own bracelets?
They can make a Girl Scout themed bracelet or one that fits their personality and latest trends!

No matter the style...they'll be right in style with Crafty Bands


Gather your supplies..Crafty Bands, images and adhesive!


The toughest part..picking the images you like!


Use the Crafty Bands Tool to punch the image.


Have fun while crafting!


Show off the fun images you chose!


Remember you can shop for Crafty Bands products at Hearthsong and Paper Wishes

February 13, 2013

Valentine Fun with Crafty Bands

Here's a quick and easy tutorial to step out tomorrow for Valentine's Day in style!
First...gather your Crafty Bands supplies and select some papers.

Next use your Crafty Bands Studio Tool to punch out the designs.

Now grab some of your adhesive dots or Therm O Web Zots and stick the Bubble Caps to the Crafty Snaps.

Next snap them onto your Crafty Band... 


Last wear it in style for Valentine's Day or all year round!


February 5, 2013

It's Time for Picto-Gizmo!

It's Picto-Gizmo time!

What is a Picto-Gizmo you ask?


Why only the coolest and best program to allow all of you who love your Crafty Bands to resize any image to perfectly fit your Crafty Bands snaps!

Here's how it works!

1) Visit our website at www.craftybands.com then select Picto-Gizmo
2) Next upload your photo right from your computer.
3) Resize or turn your photo to fit into the suggested size.
4) Save to your computer.
5) Print
6) Get out your Crafty Bands supplies and craft!

It's that easy and now your favorite pictures and more will fit perfectly into your Crafty Bands bracelets using our Picto-Gizmo software!


For this past weekend and SuperBowl Sunday...we resized this football graphic using the Picto-Gizmo along with this image that had the Baltimore Ravens logo..it was as easy as 1,2,3...


We think you're going to love it when you realize all the possibilities for it! 


And speaking of Crafty Bands...let's announce our lucky Valentine winner and that...

Katherine Langner

Congrats congrats! We sent you an email. Please reply back so we can mail your kit out to you!


January 29, 2013

Crafty Bands Valentine Printables!!

Valentine's Day!

Conversation hearts, special Valentines for someone sweet, red hearts and Crafty Bands!

Crafty Bands are the perfect way to show your style and dress up with a bit of style and flair!

 For some added fun we've created our first set of Crafty Bands printables just for YOU! 

Simply click on the image below to open up to the full size...then right click to "Save As" or "Copy" into a program such as Photoshop. Then print onto your favorite type of paper. Grab your Crafty Bands punch, select the design and go to town creating your own Crafty Bands Valentine Bracelet!


And that's not all the fun we have for you..we'd like to give you a chance to win your own fun Crafty Bands kit! We'll include the Jewelry Making Kit, a package of our Peach (light pink) Bands and Snaps, Bubble Caps and two Limited Edition White Crafty Bands Bracelets!   

Just follow the steps with our PunchTab giveaway. The more steps you complete the more entries you'll have. But don't wait too long...the giveaway ends this Sunday, February 3rd!


January 8, 2013

Make a Flowery Crafty Bands Bracelet

Hi! I'm Alison, daughter of Kate Vickers
, a scrapbooker, crafter and recent Guest Designer at Epiphany Crafts. I'm 8 years old and I live in Ontario, Canada. I'm happy to be a Guest Designer at Crafty Bands today! I want to show you how to make this flower bracelet.

Alison


Final Project

You will need:
  1. Silk or fabric flowers - We got ours from Michael's


  • Crafty Bands punch
  • (included in the Starter Kit)
  • 5 Bubble Caps
  • 5 Crafty Snaps
  • Adhesive - We used Helmar Premium Craft Glue
  • Scrapbooking paper - We used 'Pretty Parkway' from the 5th & Frolic Collection by American Crafts


  • Bracelet Supplies

    How to Make Your Bracelet
    1. Remove the flowers from the stems and remove the plastic centres. You will need 10 flowers, 2 for each Crafty Snap.

    Remove Flower

    2. Take the scrapbooking paper and put it into the Crafty Bands punch. Line up your paper inside to show the image that you would like to punch out.

    Punch on Paper

    3. Put the Bubble Cap inside the punch and press down firmly until you hear a click. The Bubble Cap will be attached to your punched out image. Remove it from the punch.

    Add Bubble Cap

    4. Glue the Bubble Cap onto the top of the Crafty Snap.

    Glue Epoxy onto base

    5. Insert the back of the Crafty Snap into the inside of the bracelet. Add two of the flowers as shown here.

    Add Flower to Band

    6. Add the Crafty Snap top onto the flower, lining up the bottom and top of the Crafty Snap. Press down to attach them. You should hear a click.

    Add Cap

    7. Repeat steps 1 to 6 for the remaining holes on the bracelet. Your finished bracelet should look something like this.

    Crafty Bands Bracelet

    Enjoy your new flower bracelet! Thanks for having me today.

    December 8, 2012

    Enter To Win a Crafty Bands Kit

    Just in time for the holidays we're offering to you a chance to win our must have Crafty Bands Starter kit!

    The Jewelry Making Kit comes with:
    1 Shape Studio Tool. 4 Crafty Bands, 20 Crafty Snaps, 20 Bubble Caps and Adhesive!

    And even better our Crafty Bands work with photos, magazines, print-outs...you can make it, trade it and wear it!

    It's your style....your Crafty Bands!  


    It's tops on the list for all the crafty girls in your life this year!

    Here's how to enter to win! Simply follow the prompts for the PunchTab giveaway. You'll earn extra entries for each additional item you complete! Then we'll let PunchTab select one random winner!

    Don't miss out...this runs through Tuesday, December 11th!! Tell your friends!


    December 1, 2012

    Wintery Crafty Bands Bracelet

    It's that time!

    Time for the weather to change and soon snow days and "Mom I'm bored" can be heard in many a house.

    We've got just the solution...a Crafty Bands bracelet!


    Simply pick your favorite papers...we chose one with snowflakes and a wintery plaid print. Punch the designs out using your Shape Studio Tool.  


    Once you've punched the design, use the included adhesive squares to adhere the design onto the top of the cap.


    Then press the cap to the snap on your Crafty Band and you're ready to roll!


    Looking for our Crafty Bands products? You can find them online at Paper Wishes!
    Don't wait too long to shop!

    Blogging tips